Learn from this
2020.7.31
容器初始化
1 | list:[] |
函数参数
位置参数
默认参数:默认参数必须指向不变对象!默认参数的值是在函数构建时被定义的。可以单独定义某个默认参数的值:
1 | def enroll(a, b, c=1, d=2): |
可变参数
可以传入一个tuple来解决
1 | def calc(numbers): |
1 | def calc(*numbers): |
*的作用是将tuple的内容拆成一个个参数然后传入。
关键字参数
可变参数允许你传入0个或任意个参数,这些可变参数在函数调用时自动组装为一个tuple。而关键字参数允许你传入0个或任意个含参数名的参数,这些关键字参数在函数内部自动组装为一个dict。
1 | def person(name, age, **kw): |
命名关键字参数
限制关键字参数的名字。
1 | def person(name, age, *, city, job): |
命名关键字参数必须传入参数名;命名关键字参数可以有缺省值。
如果函数定义中已经有了一个可变参数,后面跟着的命名关键字参数就不再需要一个特殊分隔符*了。
参数组合
参数定义的顺序必须是:必选参数、默认参数、可变参数、命名关键字参数和关键字参数。
使用*args和**kw是Python的习惯写法,当然也可以用其他参数名,但最好使用习惯用法。
切片
s[L:R:D]表示将s的[L,R)间距为D的片段切下来
特别的,s[:2] 表示切s的前两个元素;s[-2:]表示切s的后两个元素。
迭代
1 | d = {'a': 1, 'b': 2, 'c': 3} |
如果要对list实现类似Java那样的下标循环怎么办?Python内置的enumerate函数可以把一个list变成索引-元素对,这样就可以在for循环中同时迭代索引和元素本身:
1 | for i, val in enumerate(['a', 'b', 'c']): |
列表生成式
感觉很好用!
1 | L = list(range(1, 11)) |
if,else,for
1 | [x if x % 2 == 0 else -x for x in range(1, 11)] |
在一个列表生成式中,for前面的if ... else是表达式,而for后面的if是过滤条件,不能带else。
生成器
简单的生成器相当于把list换成tuple。生成器只有next方式调出下一个,不能随机访问。可以用for遍历。
1 | g = (x * x for x in range(10)) |
变成generator的函数,在每次调用next()的时候执行,遇到yield语句返回,再次执行时从上次返回的yield语句处继续执行。
generator函数也可以有返回值。如果想要拿到返回值,必须捕获StopIteration错误,返回值包含在StopIteration的value中。
1 | def triangles(): |
以上是生成杨辉三角的生成器,值得注意的一点是,函数如果直接返回A,那么在函数里A的值改变的话,导出的A的值也会变。
改进版:
1 | def triangles(): |
为什么这样就可以返回A了呢,因为每经过一次赋值操作,A的地址都会重新分配。
8.1
map&reduce
我们先看map。map()函数接收两个参数,一个是函数,一个是Iterable,map将传入的函数依次作用到序列的每个元素,并把结果作为新的Iterator返回。
1 | def f(x): |
reduce把一个函数作用在一个序列[x1, x2, x3, ...]上,这个函数必须接收两个参数,reduce把结果继续和序列的下一个元素做累积计算,其效果就是:
1 | reduce(f, [x1, x2, x3, x4]) = f(f(f(x1, x2), x3), x4) |
比方说对一个序列求和,就可以用reduce实现:
1 | from functools import reduce |
利用此方法可以方便的实现str转int:
1 | def str2int(s): |
filter
接收一个函数和一个序列,返回一个Iterator,只保留True的元素。
1 | def is_palindrome(n): |
筛回文好简单…
sorted
我们给sorted传入key函数,即可实现忽略大小写的排序,相当于把所有元素都应用key之后再排序:
1 | sorted(['bob', 'about', 'Zoo', 'Credit'], key=str.lower) |
要进行反向排序,不必改动key函数,可以传入第三个参数reverse=True:
1 | sorted(['bob', 'about', 'Zoo', 'Credit'], key=str.lower, reverse=True) |
闭包
大杀器。类似于C++中的lamba.
返回一个函数,这个函数会同时包含它所需要的变量。
需要注意的问题:
返回的函数没有立即执行,而是等到调用才执行。 返回闭包时牢记一点:返回函数不要引用任何循环变量,或者后续会发生变化的变量。
如果一定要引用循环变量怎么办?方法是再创建一个函数,用该函数的参数绑定循环变量当前的值,无论该循环变量后续如何更改,已绑定到函数参数的值不变:
1 | def count(): |
创建计数器
这道题很妙啊。
1 | def createCounter(): |
global&nonlocal
global用于修改全局变量;
nonlocal用于在函数或其他作用域中使用外层(非全局)变量。
匿名函数
关键字lambda表示匿名函数,冒号前面的x表示函数参数,冒号后面的表达式是返回值。
装饰器
函数对象有一个__name__属性,可以拿到函数的名字:
1 | f=now |
假设我们要在now函数调用前后自动打印日志,但又不希望修改now()函数的定义,这种在代码运行期间动态增加功能的方式,称之为“装饰器”。
本质上,decorator就是一个返回函数的高阶函数,可以定义如下:
1 | def log(func): |
我们可以借助Python的@语法,把decorator置于函数的定义处:
1 |
|
调用now()函数,不仅会运行now()函数本身,还会在运行now()函数前打印一行日志。
把@log放到now()函数的定义处,相当于执行了语句:
1 | now = log(now) |
wrapper()函数的参数定义是(*args, **kw),因此,wrapper()函数可以接受任意参数的调用。
decorater本身也可以传入参数:
比如,要自定义log的文本:
1 | def log(text): |
这个3层嵌套的decorator用法如下:
1 |
|
但是,这样装饰之后的 函数,它的__name__已经不是原来的函数了。Python内置的functools.wraps就是干这个事的,所以,一个完整的decorator的写法如下:
1 | import functools |
请设计一个decorator,它可作用于任何函数上,并打印该函数的执行时间:
1 | def metric(fn): |
使用decorator,还可以实现诸如:当遇到错误重试最多5次该函数,再结束。
偏函数
1 | int2 = functools.partial(int, base=2) |
固定函数的参数。
8.2
模块
1 | 'A module' # 任何模块代码的第一个字符串都被视为模块的文档注释,可以用__doc__调用 |
运行python3 hello.py获得的sys.argv就是['hello.py'];
运行python3 hello.py Michael获得的sys.argv就是['hello.py', 'Michael']。
作用域
正常函数的命名是公开的。
类似__xxx__这样的变量是特殊变量,可以被直接引用,但是有特殊用途,如__author__,__name__,__doc__。
类似_xxx和__xxx这样的函数或变量就是非公开的,不应该被直接引用。不应该,不是不能。
面向对象OOP
__init__方法相当于构造函数。注意到__init__方法的第一个参数永远是self,表示创建的实例本身。
如果要让内部属性不被外部访问,可以把属性的名称前加上两个下划线__,这样在外部就真的无法访问。但是在外部定义class的__开头的变量是可以被访问的。
在Python中,变量名类似__xxx__的,也就是以双下划线开头,并且以双下划线结尾的,是特殊变量,特殊变量是可以直接访问的,不是private变量,所以,不能用__name__、__score__这样的变量名。
有些时候,你会看到以一个下划线开头的实例变量名,比如_name,这样的实例变量外部是可以访问的,但是,按照约定俗成的规定,当你看到这样的变量时,意思就是,“虽然我可以被访问,但是,请把我视为私有变量,不要随意访问”。
这就是著名的**开闭原则 **:
对扩展开放:允许新增Animal子类;
对修改封闭:不需要修改依赖Animal类型的run_twice()等函数。
“鸭子类型”:它并不要求严格的继承体系,一个对象只要“看起来像鸭子,走起路来像鸭子”,那它就可以被看做是鸭子。
print一个class,实质会调用__str__()函数,打印此函数的返回值。直接在控制台输入变量,打印的实例是调用__repr__()。
定制类
定义了__iter__(),__next__(),就可以被用于for ... in 循环:
1 | class Fib(object): |
实现__getitem__()方法,可以按下标访问任意一项。
当调用不存在的属性时,Python解释器会试图调用__getattr__(self, 'name')来尝试获得属性。
利用完全动态的__getattr__,我们可以写出一个链式调用:
1 | class Chain(object): |
试试:
1 | Chain().status.user.timeline.list |
Niubi
任何类,只需要定义一个__call__()方法,就可以直接对实例进行调用。
1 | class Chain(object): |
type
type返回类型,是严格的类型,同一个父类下的子类互不相同。
使用instance()函数可以判断继承类型。
类和实例
可以定义类属性和实例属性,实例属性优先于类属性。
配合getattr()、setattr()以及hasattr(),我们可以直接操作一个对象的状态。
为了统计学生人数,可以给Student类增加一个类属性,每创建一个实例,该属性自动增加:
1 | class Student(object): |
我们可以给类一个方法,只需要在定义时加上@classmethod:
1 | class Dog(object): |
其他方法
__doc__()
__str__()
__repr__()
__lt__()(小于运算符)
__getitem__()(使用obj[key])
__setitem__()
__len__()
__del__()
给实例绑定一个方法
1 | def set_age(self, age): # 定义一个函数作为实例方法 |
Python允许在定义class的时候,定义一个特殊的__slots__变量,来限制该class实例能添加的属性:
1 | class Student(object): |
对子类不起作用,除非在子类中也定义__slots__,这样,子类实例允许定义的属性就是自身的__slots__加上父类的__slots__。
但是当父类无__slots__,而子类有,则无效。
@property
实现类的时候,我们常常需要提供各种借口,但是为每个接口都写一个函数有些麻烦,使用也不方便,我们可以用@property,使得可以直接调用变量,用等号修改,且进行范围检查。
1 | class Student(object): |
@property后定义的函数作为此名变量的getter方法;此时,@property本身又创造了另一个修饰器@score.setter,实现setter方法,如果没有setter方法,则变量为只读。
多重继承
RT:
1 | class Dog(Mammal, Runnable): |
如果方法重复怎么办?优先保留顺序靠前的。
需要注意,如果子类定义了__init__()函数,那么初始化时不会调用父类的__init__(),因此需要显式地调用它。
枚举类
继承自Enum。@unique装饰器可以帮助我们检查保证没有重复值。
元类
太 妙 了!豁然开朗!(用到时再复习吧)
8.3
错误处理
感觉这个挺重要的。
1 | try: |
出错时,直接跳转到except语句块。错误也是class,继承自BaseException。
如果错误没有被捕获,会一直往上抛,最后被Python解释器捕获,打印错误信息并退出。这就是调用栈。
Python内置的logging模块可以记录错误信息。
1 | try: |
这样程序可以继续运行,并且错误被记录。
except语句内可以继续raise,抛给上一层。
finally: 无论有没有异常,都会执行。优先级极高,甚至在try内return,则也会执行finally.
调试
assert+VS Code
文件读写
使用f=open(file,'r'/'rb'/'w'/'a'[,encoding=]),退出程序前记得f.close()。
方便的方法是使用with语句:
1 | with open('/Users/michael/test.txt', 'w') as f: |
建议使用with语句,以防忘记close,如果不能直接使用with语句,可以
StringIO&BytesIO
在内存中读写str。像文件一样写入即可。from io import StringIO
os模块
1 | os.path.abspath('') |
copyfile()在shutil模块。
os.walk('') 返回的是一个三元组(root,dirs,files)。
- root 所指的是当前正在遍历的这个文件夹的本身的地址
- dirs 是一个 list ,内容是该文件夹中所有的目录的名字(不包括子目录)
- files 同样是 list , 内容是该文件夹中所有的文件(不包括子目录)
1 | for root, dirs, files in os.walk('.'): |
面向对象式的os替代品:Pathlib,教程见这里
序列化
先鸽了。大致用途是将Python对象变成JSON。
常用内建模块
1 | from datetime import datetime |
如果要存储datetime,最佳方法是将其转换为timestamp再存储,因为timestamp的值与时区完全无关。
collections
namedtuple('NAME',['args'])
deque
defaultdict(function)有默认值的dict
hashlib
1 | import hashlib |
itertools
1 | for c in itertools.chain('ABC', 'XYZ'): |
8.4
昨天属实有点摸鱼。今天把urllib这些事学了。
强基快要出结果了.jpg
学这个之前要先把JSON学了。
JSON
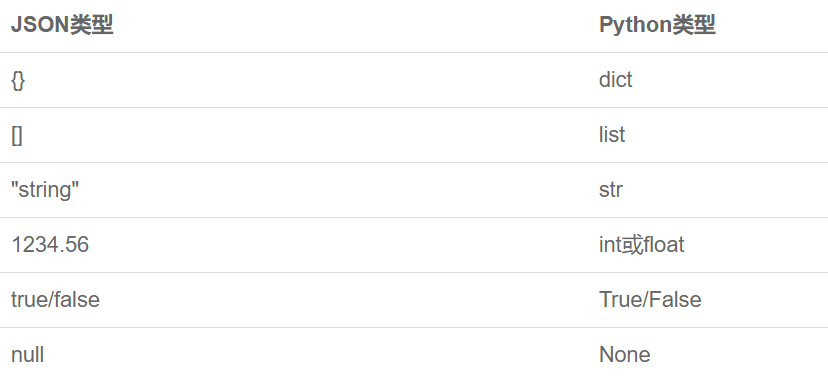
使用内置的json模块。
json.dumps(arg)返回str,内容是标准的JSON。dump(arg,file)可以直接把结果写入文件流中。
反序列化使用loads()/load()。
如果是自定义的Class如何序列化?
可选参数default把任意一个对象变成一个可序列为JSON的对象。
1 | def student2dict(std): |
有一个Trick方法:
1 | json.dumps(t, default=lambda obj: obj.__dict__) |
同理可以反序列化。
urllib
基本上实现GET和POST就够了。
GET
request模块可以发送一个GET到指定的页面。
1 | from urllib import request |
挺简单易懂的。如果使用f.getheader(str),可以返回某个header.
urlopen函数除了直接传入网址,还可以传入Request类,实现自定义header,从而自定义UA等功能。
1 | req = request.Request('http://www.douban.com/') |
POST
只需要把参数以bytes形式传入。可以借助parse.urlencode.
模拟微博登录:
1 | from urllib import request, parse |
Handler
默认使用的代理是系统设置的,如果要更改,感觉urllib提供的实现很复杂,之后学习requsets或urllib2.
1 | # urllib |
8.10
HTMLParser:先鸽了。
PIL
Python Imaging Library
1 | from PIL import Image |
生成验证码
1 | from PIL import Image, ImageDraw, ImageFont, ImageFilter |

加强过后(加入了字符旋转):
1 | from PIL import Image, ImageDraw, ImageFont, ImageFilter |

爽!PythonNB!
requests
比urllib更强悍。
1 | r = requests.get('URL') |
对于带参数的URL,传入dict作为params参数。
headers参数可以传入dict。
另外一提,使用http访问百度搜索不需要UA,使用https就必须UA。
要发送POST,只需要把方法变成post(),然后用data参数作为POST请求的数据。默认使用application/x-www-form-urlencoded对POST数据编码。如果要传递JSON,可以传入json参数。
重写百度翻译爬虫ing
上传文件可以使用files参数,读取文件时,必须使用'rb'模式,这样获取的bytes长度才是文件的长度。
1 | upfile = {'file': open('name','rb')} |
requests对cookie做了处理,使我们不必解析cookie就可以直接获取指定的cookie。
1 | print(r.cookies['token']) |
要传入cookie,只需将dict传入cookies参数。
要指定超时,传入以秒为单位的timeout参数。
chardet
对于未知编码的bytes,转换成str需要“猜测”编码,chardet这个第三方库通过收集编码的特征字符,有很大概率猜对。
1 | data = '离离原上草,一岁一枯荣'.encode('gbk') |
confidence是概率。
psutil
psutil = process and system utilities
获取系统信息,先鸽了。
8.13
字符串
新的格式化字符串的语法:f-string。以f开头,表达式用{}包起来(似乎这样无法输出{,}字符):
1 | name = 'Runoob' |
在Python 3.8+可以使用=拼接表达式与结果:
1 | x = 1 |
内建函数
.count(str,beg,end)
返回出现次数,可以指定范围。
.find(str,beg,end)
查找子串,如果存在,返回开始的索引,否则返回-1.类似的有rfind()。
.join(seq)
以字符串为分隔符,合并seq中的元素为新串。
.replace()
strip()
删去前后空格。类似的还有lstrip(),rstrip()。
.split(str,num)
以str为分隔符截取字符串,如果num有指定值,则仅截取num+1个。
.splitlines()
.startwith()
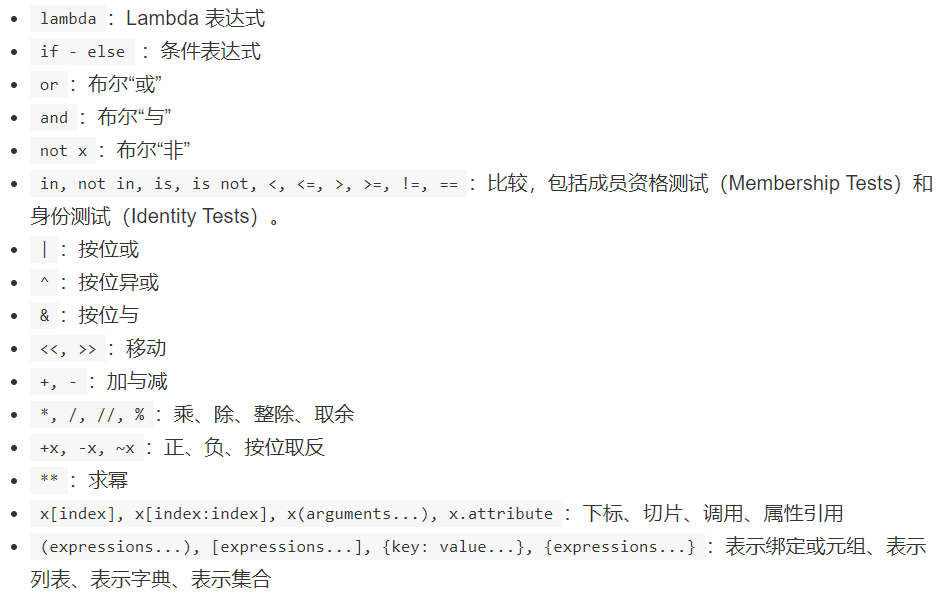
运算符
:=:海象运算符,可以在表达式内部为变量赋值。
is,is not:身份运算符,x is y等价于id(x)==id(y)(id用于取址)。
and:从左到右计算表达式,若所有值为真,返回最后一个值,否则返回第一个假值。(or同理)
其他
Python整数对象的储存为无符号数加符号位。因此不存在补码。
Python的变量只要值相同,标识都相同。也就是说:
1 | a = 5 |
只要列表、字典内容一样,那么标识也一样。
元组的标识是跟着变量名的。
8.14
heapq 提供了基于正规链表的堆实现。最小的值总是保持在 0 点。
heapify,heappop,heappush
calendar标准库提供对日期、星期的计算支持。
Python Performance Tips
对于字符串拼接,优先使用''.join();避免过多的加法连接,使用'<html>%s%s%s</html>' % str代替。
避免.,将频繁使用的推出函数用一个变量代替。
有限使用局部变量,它们的访问速度很快。(因为Python会现在局部的__dict__中查询,再到全局中查询,而且miss的哈希表查询更加慢)
优先使用map,速度快。
对于大部分情况下为假的if语句:
1 | # slow |
另一种选择是使用defaultdict类。
Python函数调用的开销高。优先使用内置函数,因为内置函数是用C直接写的。
Python中加法比位运算快。(因为Python的int不定长,所以位运算比较鸡肋)
8.16
伪三目运算符:
1 | a = 'a' |
要求a不能为假(不为空)
安全使用的方法:
1 | a = '' |
为什么要使用这么丑陋的语句?因为Python有时不能使用if语句,例如lambda函数中。
通过compile,exec,eval函数可以在运行时确定执行的代码。
os.system()可以在cmd中执行命令。